7.2.2 Soldering Through Hole Components, Solder Fountain Method
Outline
This procedure covers the general guidelines for through-hole component soldering using a solder fountain system.
There is basically only one style of through-hole component. Whether there are a few leads or many or whether the component is large or small the component removal principles using this method are the same.
Caution - Operator Safety: This process uses molten solder and exposes the untrained operator to serious hazards. A thorough review of the equipment manual and comprehensive training is mandatory. Daily maintenance is essential. Consult the equipment manual for more information.
Caution - Component Sensitivity: This method may subject the component to extreme temperatures. Evaluate the component's tolerance to heat prior to using this method.
Caution - Circuit Board Sensitivity: PC Boards are made from a great variety of materials. When subjected to the high temperatures of the molten solder used in this method, they are susceptible to the following types of damage:
1. Layer delamination.
2. Copper delamination, separation of pads, barrels of inner layers.
3. Burns and solder mask chipping.
4. Warp.
Each circuit board must be treated individually and scrutinized carefully for its reaction to heat. If a series of circuit boards are to be reworked, the first several should be fully protected until a reliable procedure is established.
Minimum Skill Level - Expert
Recommended for technicians with advanced soldering and component rework skills and extensive experience in most repair/rework procedures.
Conformance Level - High
This procedure most closely duplicates the physical characteristics of the original, and most probably complies with all the functional, environmental and serviceability factors.
Cleaner
General purpose cleaner for removing contamination.
Microscope
Precision microscope with stand and lighting for work and inspection.
Oven
General purpose oven for drying, baking and curing epoxies.
Solder Fountain
Solder fountain system for selective component removal and replacement.
Soldering Iron
Properly maintained soldering iron and properly sized soldering iron tips.
Wipes
Nonabrasive, low-linting wipes for cleanup.
Images and Figures
Through Hole Component
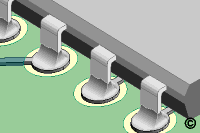
Figure 1: Typical solder fountain system.
Solder Fountain System
Most solder fountain systems have the same basic components. A solder pump and solder reservoir, various nozzle sizes, controls for solder flow height, solder temperature, and timers.
Solder from the reservoir is driven up through the nozzle by the pump. Nozzles are made of steel with welded seams and connections. It is important that the nozzle construction allows for the capture of the pump's inflow and for the runoff of the solder. This prevents the excess splashing and maintains a usable solder level above the nozzle lip.
Occasionally the opening in the solder fountain table needs to be restricted to prevent solder splash from contaminating the unworked part of the board. Do not close the opening too tight or you may impede the nozzle run-off.
Above the solder fountain head, there is generally a light projected alignment mark that permits you to center the part to be removed over the nozzle.
Solder Height Adjustment
Solder height should be set at 1.50 mm - 3.00 mm (.060" - .120") above the lip of the nozzle. The ideal situation is to have the leads of a component just immersed and wetted without having the wave exert any upward pressure on the circuit board. The solder fountain table surface should be parallel to the nozzle surface. Components and leads on the bottom side of the circuit board may cause the PC board to be uneven, this condition must be compensated for.
Insufficient immersion will prevent proper heat transfer and reflow. Excess pressure will cause the solder to surge up through holes and spill out onto the top side of the circuit board.
Solder Temperature Adjustment
Solder temperature adjustment varies depending on several factors. The normal setting is 260 C (500 F.) During heavy use, solder temperature may cycle between 250 C - 270 C (480 F - 520 F.) The heaters should react quickly to normal drops in temperature. The heaters may overshoot the preset temperature when vigorous activity is suddenly halted. Operators must be alert to temperature fluctuations that exceed preset standards.
Solder Fountain Time Adjustment
This adjustment can be used to precisely control operations of a repetitive nature or in instances where you want to strictly control a circuit board's exposure to the solder fountain heat.
The timer may also be set to maximum, and the on/off action of the wave is controlled by the motor on/off foot pedal or by lifting the board on and off the wave.
Extractor/Insertion Tool
There are a variety of tools to help extract and/or insert the component once reflow has been achieved. The extractor/insertion tool should provide the operator a good grip but should not unduly damage the component during removal or insertion.
PC Board Pre-heat
Recommendations for pre-heat range from 1 to 4 hours at 65 C - 120 C ( 150 F - 250 F.) The requirements of temperature and time for pre-heat depend on the board construction, age, and exposure to the atmosphere.
In general terms, the pre-heat will serve four purposes.
To drive out volatiles or moisture from the circuit board. Moisture that has penetrated the board may cause expansion or delamination when it is rapidly heated.
To prevent thermal shock to the board. The ambient temperature in buildings in the winter can be as low as 13 C (55 F.) As the circuit board at this temperature comes in contact with molten solder, the extreme shock of the widely varying temperature may cause surface or internal damage.
Pre-heat may permit you to pre-expand the circuit board. Some circuit boards expand so severely at the point of high heat that they will bow up or down enough to create difficulties in maintaining proper board profile to the solder wave.
Pre-heat raises the temperature of the circuit board and the component to be removed. This allows for quicker component removal. This reduces the potential for the burning of the solder mask and the circuit board surface and reduces the potential for other thermal damage.
Procedure - Circuit Board Preparation
The area surrounding the component to be removed may need protection. If components or the circuit board surface are susceptible to damage or exposure to solder, they may be protected by using the following procedure:
Straighten any leads that may prevent the easy removal of the part.
Apply High-Temperature Tape to any flat surfaces surrounding the rework area to insulate the surface from extreme temperatures. Or apply the high-temperature flexible mask to protect irregular surfaces. The mask may need baking to provide the proper cure prior to reflow.
Select an extractor tool and check the fit to be sure the component can be grabbed easily.
Procedure - Circuit Board Pre-heat
PC Boards returned from the field or where they have been exposed to moisture for some time.
Bake for 4 hours at approximately 75 C (165 F.) Prior to part removal, the circuit board should be pre-heated for one hour prior to removal of the part. If possible, perform reflow immediately upon the removal of the circuit board from the oven after completion of the baking cycle. If the circuit board must sit between the pre-heat and removal, it may sit for a maximum of one night only in a dry atmosphere.
Top heat during removal is only used when working with the most difficult components. To apply top heat, a heat gun is positioned directly above the solder nozzle at a set distance above the circuit board surface. Top heat is applied for a set time prior to activating the solder fountain. Heat-sensitive chalk applied to the component will signal when the proper temperature has been achieved.
Procedure - Installation Process
Preform component leads if needed, and test on a practice board to be sure leads are properly aligned.
If the holes in the circuit board are clear, insert the component. If needed, secure in place by bending leads or other mechanical means.
Turn on the solder fountain system and allow the solder to reach the proper operating temperature. Clean the machine as needed, and test run the pump to be sure there is no buildup of contamination that may cause a drag on the pumping system.
Select the proper nozzle and place it into the bath of the solder fountain system. A nozzle that is too large will expose the circuit board surface to unnecessary heat. A nozzle that is too small may not reflow all the component leads.
Check the table height and solder wave height to be sure they are properly set for the circuit board to be worked on.
Apply liquid flux to all the solder-filled holes or to the component leads if the component has been inserted into open holes. Apply the flux to both the top and bottom sides.
Place the circuit board over the nozzle. Check the position using the alignment light.
Activate the solder fountain. Once full solder reflow has been achieved, insert the component, if not already in place. A great deal of operator skill and experience are required to expect good results when inserting the component during the solder fountain cycle
Immediately drop the solder fountain wave to prevent overexposure.
Allow the circuit board to cool before handling and inspection.
Clean the area and inspect for signs of damage.
Solder Joint Acceptable Criteria - Through Hole Components
Feature
Dim
Class 1
Class 2
Class 3
Circular wetting of solder of the lead and plated hole barrel on the component side.
1
Not Specified
180 deg
270 deg
Plated hole fill.
2
Not Specified
75%
75%
Circular fillet and wetting of solder of the lead and plated hole barrel on the solder side.
1
270 deg
270 deg
330 deg
Percent of the land area covered with solder on component side.
3
0
0
0
Percent of the land area covered with solder on the solder.